Why is this App called Stamping?
In the classroom version of the Baratta-Lorton Reading Program that has been in use since 1985, students use rubber stamps to stamp out the sounds for the words they wish to write. The Stamping app's “stamps” may look different in app form, but their use is just the same, so their name remains the same.
Reading and Writing - Interchangeable
The stamps offer children a unique opportunity to begin creative writing as soon as they have learned all 44 sounds. Writing with the stamps permits children to see reading and writing as interchangeable processes. A child who sees  and can say "ear" is a beginning reader. A child who hears "ear" said and can stamp out is a beginning writer. A child who can think "ear'' and translate this mind's thought into has mastered the basic understanding necessary to read and to write. and can say "ear" is a beginning reader. A child who hears "ear" said and can stamp out is a beginning writer. A child who can think "ear'' and translate this mind's thought into has mastered the basic understanding necessary to read and to write.
Feeling of Power
The logical progression of learning, presented in the Flipbooks, Booklets, Worksheets, and Picture Packets apps is, of course, important in insuring every child learns to read and read well. But the logical progression cannot capture for the child the excitement that comes from being able to put his or her own words on paper, or the feeling of power that writing affords when what one has written can actually be read by someone else - even if initially that someone else may only be teachers or parents and siblings.
Ready to Begin
The child is ready to begin stamping or “writing” any words he or she wishes as soon as he or she has learned all 44 sounds. “Ready to begin” does not mean ready to master. For a child to stamp out a word correctly, he or she must hear all the sounds within that word. This is not always easy, but it is always possible. All it takes is time, practice, and a parent or teacher with whom to share the experience.
Free to Write Anything
The child’s first efforts may not be readable by anybody but the child doing the writing. The words may be missing sounds, or include extra sounds, or the wrong sounds, or have the sounds in the wrong order. None of this is important. What is important is that the child is free to write anything he or she wishes, how ever well or poorly the child may perform this writing at the start.
Enhancing the Experience
To enhance the writing experience, whatever is stamped can also be saved and printed out. The child can then illustrate the words either on the printed page or on a separate sheet of paper. Or, if the child prefers, a picture may be drawn first and the accompanying words stamped out once the drawing is completed.
Necessary Training
The purpose of stamping is to allow children the freedom to write words and phrases of their own creation. This purpose is achieved only with some necessary training along the way.
Step One
Once the child has been introduced to the triangle level of the Booklets and Reading Worksheets, he or she is introduced to Stamping. For this introduction, a teacher, parent or an older sibling dictates triangle-level two and three-sound words, one word at a time, to the child as the child stamps out each word said. This gives the child necessary practice in hearing words and writing the words heard. The word list to be used for dictation is downloadable from this link:
Click here to download the Stamping Word List
The word list can be printed directly from an iPad or dragged to your desktop for printing from your computer.
As the child is ready for circle level activities, circle-level words are read to the child for stamping. Square-level words are read in their turn, followed by rectangle-level, then star.
Step Two
Once all 44 sounds are known, the child is ready to begin writing anything he or she wishes. Each time the child writes something to share, the parent or teacher reads with the child what the child has stamped out. It is during this joint adult-child reading process that the parent or teacher begins the gentle process of helping the child hear more correctly the sounds that make up words.
What the Child Hears
The child stamps what the child hears. What the child stamps allows the parent or teacher to refine the hearing. It is "biscuit" not "visket", "dress" not "jress", "birthday" not "birday", and so on.
The Stamping app instructions below describe how easy it is for the parent or teacher to edit the child's writing with the child. Sound images can be deleted and/or inserted effortlessly.
Learning with the Child
The challenge for the parent or teacher is not the adding or removing of the sounds. It is learning with the child the sounds to be heard in each word. As the child is learning to listen for the sounds in words, the parent or teacher is learning to listen, as well.
Adult Advantage
Adults have a distinct advantage over children in listening for the sounds in words. Adults already know how most words are spelled. The spellings for words come from their sounds. As an example, if a child stamps out  "jress" instead of "jress" instead of  for "dress" the adult knows dress begins with the for "dress" the adult knows dress begins with the sound and not the sound and not the sound. Adults bring with them an understanding of the sounds that form words that children do not yet possess. sound. Adults bring with them an understanding of the sounds that form words that children do not yet possess.
Stamping App Instructions
Press Here to Start
When the app is first opened and "press here to start" is pressed for the first time, the app will ask permission to access your Photos app. Press OK because Photos is where the Stamping app will store any story the child writes and saves for sharing.
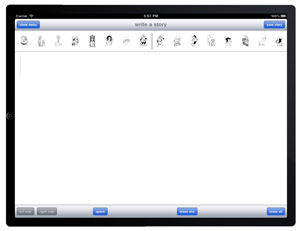
Hide Menu
The Stamping app opens with all of its menu choices showing. As the child first begins stamping, the "hide menu" button is pressed. This enlarges the stamping surface and makes the two stamping scroll bars at the top of the stamping surface available.
Top-Left Scroll Bar
The top-left scroll bar displays the triangle-level's first 8 sounds. When the child is stamping out the triangle-level two and three-sound words, all the sounds needed are in the top left-hand row.
Scroll one row down on the left-hand side to see the next 8 sounds, which together with the first row, comprise the circle-level’s 16 sounds. The sounds for the circle-level two and three-sound words are contained in these two rows. The third row adds 8 more sounds for the square-level's two and three-sound words.
Top-Right Scroll Bar
The top-right scroll bar contain the 25th through 32nd sounds, which when combined with the three left-hand rows, comprise the rectangle-level sounds. The next two right-hand rows add the remaining 12 sounds of the star-level.
Three Additional Symbols
The third right-hand row of the Stamping app that contains the final 4 sounds also includes three additional symbols – a period, a question mark, and a silent-letter stamp. The period and the question mark are introduced to the child once story writing begins. The silent-letter stamp is for the teacher's or parent's eventual use, not the child's.
Punctuation
As the child writes for others to read, he or she will eventually learn that the reader, as opposed to the writer, needs to know when one thought ends and the next one begins. It is also useful for the reader to know if a question is being asked. Periods and question marks provide these clues.
Silent-Letter Stamp
The silent-letter stamp is not used by the child. It is there for use by the parent or teacher if he or she elects to use the Stamping app later on, either to edit the child’s stories for easy translating to traditional letters, or to write new stories for the child to translate into traditional letters. Its use is described in the Writing Worksheets instructions.
The Order of the Sound-Images
The sound images are presented in the same order as they are introduced in Dekodiphukan. They are also in the same order as the sounds on the decoding chart. The first eight sounds in the scroll bar are the first eight sounds on the decoding chart, the second eight in the scroll bar are the second eight on the decoding chart, and so on. However, the decoding chart will not yet have been introduced at the point when the child first begins using the Stamping app. A teacher, parent, or child who wishes a quick guide to the location of the sounds in the two scroll bars can download the Sound Review Chart and keep it handy for reference.
The Sound Review Chart's two pages can be printed from either an iPad or by dragging the two halves of the chart to your computer's desktop. Printing from your computer allows you to rotate the images from portrait to landscape.
Specific Instructions
Writing
To place a sound on the writing surface, tap twice on its image (for the period and the question mark, one tap is enough). Press the "space" button to add a space between sounds or words. Press the "erase one" button, to erase the space or sound image to the left of the cursor. To move the cursor, tap on the sound-image or space to the left of where you wish the cursor to appear. If you want the cursor to the left of the very first image on the screen, tap to the left of that image and the cursor will move to the start. To clear the screen, press the "erase all" button and then "yes".
Saving Stories
Pressing the "save story" button brings up "your story's title:" Tapping on the white line brings up the iPad's keyboard. A child can enter anything in the box as a title, including numbers. Clicking on "Save" saves the story. Click on OK when the “your story is saved” button appears. The story saved is now in the “your stories” list in the main menu.
Editing
To edit a story already written, open it in the “your stories” list. Press the “edit stories” button. Click the "hide menu" button to access all the stamps. Move the cursor to the point or points where changes are to be made. Use the “erase one” button to erase sound images. When finished, press the “done” button. Press OK when the “your story is saved again” button appears.
Parents may use the editing feature to add in silent letter sounds when the child reaches the transition level of the program.
Printing Stories
To save a story for printing or sharing.
Open the story in the “your stories” list.
A “save for sharing” button appears in the top menu bar.
Press this button to save the story as a photo image in the iPad Photos app.
Press OK on the “story saved in Photos” alert button.
Stories saved to Photos are shareable and printable in the same manner as any photo album images are shareable and printable.
Story pages print in landscape mode on standard 8.5 X 11 paper. The saved story prints from edge to edge on the paper. To add a white edge or border to the story, you may either add in appropriate spaces at the beginning or end of each line of sound-words, or you may upload the captured story to your computer's Photos and print the story using either a "Scale to Fit Media" option or print the story at 95%.
Menu Summary
Press the “show menu” button to see the menu.
When the menu is displayed, the right-hand scroll bar is no longer visible on the screen.
Press the “right side” button to display the right-side scroll bar.
Press the “left side” button to display the left-side scroll bar once again.
Choose “write a story” for stamping anything new.
Choose “your stories” for a list of stories saved.
Press the “delete” button to delete stories from the list.
Choose “change stamp size” to adjust the size of the sound images.
Creative Writing
Once a child has learned all 44 sounds and can stamp out the words learned, creative writing's first phase comes next.
The 44 sound-images are also available as a computer font. Instructions for downloading this font to your computer are included at the end of the Creative Writing section.
|